| Home | Configs | Guides | About |
Table of Contents
Installation
Download Virtual Box
This can be done in any virtualization platform, but we will use virtual box for this example.
- The installer can be found at https://www.virtualbox.org/wiki/Downloads
- If you are currently running Windows, choose the "Windows hosts" option (This is not the virtual machine OS, but rather the OS you are currently using)
- Run the installer and follow the default prompts
Download the iso
- Go to the Arch Linux downloads page and select a mirrir site under the HTTP Direct Downloads section
- Verify the SHA256 hash of the iso. As of the time of writing this, the page indicates the ISO should have a SHA256 hash of 5934a1561f33a49574ba8bf6dbbdbd18c933470de4e2f7562bec06d24f73839b
openssl sha256 archlinux-2022.04.05-x86_64.iso
Create the VM
- Open VirtualBox
- Go to File -> New Virtual Machine
- Name your system and under Type version, choose Linux, Arch Linux (64-bit)
- Click Next
- Choose a memory size of 2GB (2048 MB)
- Click Next
- Choose "Create a virtual hard disk now"
- Click Create
- Click Next
- Click Next
- In the box, type 50GB (or more)
- Click Create
Configure the VM
- Right click on your new VM and click Settings
- Under System -> Motherboard, Enable EFI
- Under System -> Processor, set Processors to at least 2
- Under Storage -> Controller: IDE, select the disc icon
Select the other disc icon on the right and choose to browse for your Arch Linux ISO image:

- Once you have your disk image selected, click OK
- Now we can start our VM. Select it and click "Start"
Installation
Boot
- At the prompt, choose the default option to boot into the Arch Linux ISO
Verify Boot Mode
- Confirm that we are in EFI mode. Run the following command. If there is output, then are are in efi mode. If we get a file not found error, then we are not in efi mode and we will need to redo Configure the VM.
ls /sys/firmware/efi/efivars
Networking
- Verify network interface is recognized by the system. There should be two network interfaces: one for the loopback adapter (lo) and one for your system. Likely it will start with an 'e'. If you only have one interface, please refer to The VirtualBox Networking Guide.
ip link
- DHCP - Verify
DHCP is a protocol that allows a client machine on the same network as a DHCP server to request networking information. This information typically includes the following:
- An IP address (See IP Addresses for more information)
- The network range that we are in (i.e. the size of our subnet. See Subnetwork for more information)
- The DNS servers for the network (see Domain Name System for more information)
This protocol allows machines to setup their own networking, rather than a person having to do it themselves.
In this case, we use the ip addr command to make sure that we were given an IP addres. As seen below, our network interface "enp3s0" was given an IP of "172.16.1.220" and a network of "/24".
ip addr
- DNS Verify
Linux stores its DNS server configuration in "/etc/resolv.conf". We will use the cat command to view the contents of this file. You should see at least one "nameserver <ip>" line in this file. If not, DNS was not configured properly.
cat /etc/resolv.conf
- Internet Connectivity Check
Here we will use the ping command to verify internet connectivity. See Ping for more information. Alternatively, you can use the "man" command to get information about ping ("man ping").
ping archlinux.org
Disk Setup
- We are going to need three partitions:
- EFI Boot partition
- The root partition
- The swap partition
- Ensure Disk is Recognized by the system
- Run the lsblk utility and look for an entry that says "disk" under the "Type" heading
lsblk
- Take note of the "NAME"
- Create Partition Table
- Next, we are going to start the parted utility to edit our disk
parted /dev/{device_name} # In my case, it is "sda"- Now we will use the mklabel command to create a partition table. We are going to use the gpt format
mklabel gpt
- EFI Boot Partition
- To create the boot partition, we need to know where the first available byte is on our disk. We will use the "print free" command to determine this:
print free
- We will use the "Start" as the beginning of our partition and then add the number of bytes we want onto that.
mkpart gpt fat32 {start} 500MB- If you are prompted about the "closest" the system can get, just type yes and hit enter
- If you are prompted again about the system alignment, just hit I and enter to ignore
- Next we are going to set the esp (boot) flag on our partition. Use the "Print" command to get the partition number of your drive and then run:
set {partition_number} esp on - Swap Partition
- For the swap partition, we will use the mkpart utility again. Make sure you find your "start" using the print utility first.
mkpart gpt ext4 {Start} {End}- Now we will exit parted with the quit command and set our swap partition to be recognized as swap
- To do this, we will need to know the partition name of the swap partition using lsblk. We know our swap partition should be the second partition and should be about 1GB in size
lsblk
- We will use the mkswap command to enable swap on our partition:
mkswap /dev/{swap_partition_name} - Root Partition
- Open parted back up on your disk:
parted /dev/{disk_name} #+end_src- - We will make one more partition using the mkpart command. This time, we will use the rest of the disk. We will make life easy and just use "100%" for the end. Parted will know this means the rest of the disk #+begin_src bash :exports code mkpart gpt ext4 {Start} 100% - File System
Now that we have our partitions created, we need to add a file system to it.
Our root partition file system type was specified as ext4 and our boot partition was fat32.
- We will use the lsblk command again to get our partition names. Roots will be the last one, while the boot partition will be first, if you followed the steps in the same order as they were done above.
lsblk
- To create the ext4 file system, we will use the mkfs.ext4 utility and to create the fat32 file system, we will use the mkfs.fat utility with the -F flag set to 32:
mkfs.ext4 /dev/{root_partition_name} mkfs.fat -F 32 /dev/{boot_partition_name} - Mounting
Now that we have the root partition file system created, it is ready to be written to. The problem is, however, that we can't access the disks, yet. First, we have to mount the partition to our temporary iso file system. This will add a folder to our file system that maps to the partition.
- To do this, we will use the mnt command, but first, we have to create somewhere to mount it to. While you can mount it to any directory on the system, the /mnt directory exists for this purpose.
- First, we will create a folder in /mnt called arch (this can be called anything, it doesn't matter)
mkdir /mnt/arch
- Now mount the drive using the mount command
mount /dev/{root_partition_name} /mnt/arch- We also need to mount our boot partition. This partition goes in the {rootfsmountpoint}/boot.
mkdir /mnt/arch/boot mount /dev/{boot_partition_name} /mnt/arch/boot- Since we are getting our disks ready to work on, let's also enable the swap partition. I will explain why we do this later
swapon /dev/{swap_partition_name}
OS Installation
- Package Management
In order to download packages, we need to tell our package manager (pacman) where to download them from. The file that holds the list of servers to download from is /etc/pacman.d/mirrorlist.
We won't be editing this by hand, however. There is a nice utility called reflector that we will use to choose our servers for us based on our preferences.
- We will use the –country flag to tell reflector we want to use US-based mirrors (servers that hold packages) and the –protocol flag to specify that we only want to download over https
- We will redirect the output of that command into the mirrorlist file. If you're curious, you can run it without the redirect to see what it outputs. This will not effect your system
reflector --country US --protocol https > /etc/pacman.d/mirrorlist
- Kernel Install
Now it's time to install Linux onto the drive. We do this usin the pacstrap command. When we are booted into the system, we will use pacman to install packages. However, since we are still booted into our iso, we will use the pacstrap command to install packages into the mounted file system. This command will install three packages:
- base - the arch linux base package containing necessary arch packages
- linux - the linux kernel
- linux-firmware - software needed for linux to interface with the firmware
pacstrap /mnt/arch base linux linux-firmware
- Networking
To manage the networking on the system, we will need a network manager. There are a few to choose from, but we are going to choose "NetworkManager", which is a network manager that has a GUI that we can use later if we want to.
pacstrap /mnt/arch networkmanager
- Text Editing
We need to install a text editor so we can edit files. For simplicity, we will install both nano and vim.
pacstrap /mnt/arch nano vim
- Documentation
We will also need to install man pages for package documentation.
pacstrap /mnt/arch man-db man-pages
OS Configuration
Now that the operating system is installed, we need to configure the various parts of the system.
- Fstab
To ensure our disks are re-mounted on boot, we need to populate the /etc/fstab file in our system. There is a nice utility to do this for us called genfstab, copying the current mounting setup as we have it in our iso environment (Remember, we mounted the drives earlier so we could edit them).
- Run the genfstab command, pointing it at our mounted file system
genfstab -U /mnt/arch >> /mnt/arch/etc/fstab
- Verify fstab was populated properly with cat:
cat /mnt/arch/etc/fstab
- Chroot
The next few configurations will require our tools to think we are booted into our drives, even though we are booted into the iso system. To do this we will use the chroot utility. Actually, we will use Arch linux's version of the chroot tool, called arch-chroot.
- Call the chroot utility and point it at our mounted drive:
arch-chroot /mnt/arch
Everything you do from this point on will be done inside your newly installed arch system.
- Timezone
The next thing we will do is set the timezone. Let's see what our timezone is set to right now with the timedatectl command:
timedatectl status
Most likely, your system is currently running in the UTC timezone. To change it, we first need to gather a list of time zones:
timedatectl list-timezones
Set the timezone to your current timezone. We will do this by creating a "soft link" between our selected time zone and our system's localtime file.
ln -sf /usr/share/zoneinfo/America/New_York /etc/localtime
Run the hwclock utility to generate an /etc/adjtime file. This file keeps track of the clock's drift, allowing the clock to adjust the system time as needed when it gets off track.
hwclock --systohc
Let's verify the system time zone was change successfully with the date command:
date
- Localization
Localization is used to specify the region language and format. For us, this is enUS.UTF-8. enus being english, US and UTF-8 being the text encoding format that we use.
- Edit the /etc/locale.gen file and uncomment it.
vim/nano /etc/locale.gen
- We also need to create the file /etc/locale.conf and add the following line:
LANG=en_US.UTF-8
- Now we will run the local-gen command to finish it up
locale-gen
- Network Configuration
The only thing we need to do for networking is to set the system hostname. This is the "Name" of the system, as other entities on the network will see it.
- To do this, edit the /etc/hostname file and simply add your hostname to it (nothing else)
vim/nano /etc/hostname
- Root Password
Set the root password with the passwd utility:
passwd
Boot Loader
Now that our operating system is configured and ready to run, we will install a boot loader. The boot loader is the system that the BIOS calls when the system is turned on. The boot loader will then set the necessary parameters and start the kernel.
The vast majority of linux systems are using GRUB (GRand Unified Bootloader). We will also, as it will be the most supported and documented.
Now that we have tricked our tools into thinking that we are booted into the system drive, we will use the system's package manager (pacman) to install packages.
Additionally, we need to install microcode updates from Intel/AMD (depending on your CPU). If you don't have an Intel or AMD CPU, skip this part. Microcode updates install bug fixes in the microcode of the processor. For more details, see the Arch Wiki "Mirocode" section. For Intel, this package is called intel-ucode. For AMD, amd-ucode.
- Using pacman, install the grub and efibootmgr packages using the -S flag
pacman -S grub efibootmgr intel-ucode/amd-ucode
Now we will install GRUB into our boot partition. Remember where our boot partition is mounted? While outside of our file system (not chrooted), we mounted it to /mnt/arch/boot. Now that we have chrooted into /mnt/arch, it is now just mounted at /boot.
- Install GRUB into our boot partition with the grub-install command:
grub-install --target=x86_64-efi --efi-directory=/boot --bootloader-id=GRUB
- Finally, generate the GRUB configuration file, with grub-mkconfig
grub-mkconfig -o /boot/grub/grub.cfg
REBOOT
Congratulations, you have now installed your Arch Linux operating system. We need to reboot and make sure it worked. Let's exit our chroot (with exit) and unmount the partitions with the umount command:
exit
umount -R /mnt/arch
- Now let's reboot with the reboot command
reboot
Note: If we were not using a virtual machine, this is when we would remove our install media (flash drive, CD, etc.) that we booted from to keep the system from booting into it again. Virtual Box will do this for us, though.
Post Installation
Now that our system is installed properly, there are some post-installation tasks that will need to be performed.
Networking
We installed the NetworkManager package to manage networking. Let's use the systemctl utility to see if it's running
systemctl status NetworkManager # THIS IS CASE SENSITIVE
You will notice that the service is not running. This is because we never enabled it. We can do that with the systemctl utility again.
- Enable and start the NetworkManager service
systemctl enable NetworkManager
systemctl start NetworkManager
- If you need to connect to a wireless network, use:
nmtui
- Now let's see if we have an IP address:
ip addr
- Just to be thorough, let's also make sure we have internet connectivity with the ping command, like we did in our live iso environment:
ping -c 3 archlinux.org
Users and Groups
Currently we are running our system as the root user. The root user has 100% full privileges on the system. This is very dangerous, not just for security purposes, but for system safety. If we run the wrong command as root, we can brick our system very quickly.
- Let's add a non-root user for us to login as with the useradd utility.
–create-home : setup the user's home directory in /home (like C:\Users in Windows). -s : set user's default shell
useradd --create-home -s /bin/bash {username}
- Let's also create a password for our user:
passwd {username}
- This is our system, so we will still want the ability to run privileged commands. Without it, we can't do much on the system. To do this, we will use the "sudo" package. This is not installed by default.
pacman -S sudo
Now that we have sudo installed, we need to tell the system that our user has privileges to use it. To do this we need to edit the /etc/sudoers file. HOWEVER: we will not be manually editing this file. This is very dangerous and can mess up your system if you lose access to the root user. To edit this command, we will use the visudo utility.
- You will also need to tell visudo what text editor to use when editing the file. We do this by setting the EDITOR variable before running the command. We will make this change permanent later.
EDITOR=vim/nano visudo
- Uncomment the following line:
%sudo ALL=(ALL:ALL) ALL
- Optionally, you can tweak the line to not require a password by adding NOPASSWD:
%sudo ALL=(ALL:ALL) NOPASSWD: ALL
This will grant any user that is a member of the "sudo" group sudo privileges.
- The sudo group does not exist yet. We can create it with the groupadd utility:
groupadd sudo
- We are not in the sudo group yet, so let's add ourselves with the usermod (user modification) utility:
usermod -aG sudo {username}
- Let's change to our user with the su (switch user) command:
su {username}
- To use sudo, simply prefix your command with "sudo". Let's see if our changes worked by listing the contents of the /root directory:
sudo ls /root
If there was non-error output or if there was no output, this is working as expected.
Shell Customization
Now that we have our user set up, let's make life a little easier by automating some tasks
.bashrc
Since we are using the bash shell, we can run commands any time we open a new shell by editing the .bashrc file.
This file is located in the user's home directory. The current home directory can be shorthanded with '~'. For instance, ~/.bashrc is the same as home/{username}.bashrc
- Let's create this file. First, we need to change to our home directory. Let's do this with the cd command:
cd ~/
- Now, let's edit our .bashrc file
vim/nano .bashrc
There may be some code in there already. This is fine and we are going to append our changes to the end of the file.
EDITOR
Earlier we had to tell visudo what our default text editor was. Let's make this a permanent change using the export command in our .bashrc file. Also, some programs use the "VISUAL" environment variable, so we will set that as well
Get in the habit of adding comments to everything that you do. Nothing should ever be configured without comments if you can help it.
# default text editor
export EDITOR=vim/nano
export VISUAL=vim/nano
Aliases
There will be some common commands that you use all the time that get tiring to type over and over. Let's create aliases for some commands we will be running frequently:
# -l : show details
# -a : show hidden files
# -h : show file sizes in human readable format
alias ll="ls -lah"
alias l="ls -lh"

# cd N directories up
alias ..="cd .."
alias ...="cd ../.."
alias ....="cd ../../.."

# -S : install
# -y : update package index from repositories
alias install="sudo pacman -Sy"

# -u : upgrade packages
alias upgrade="sudo pacman -Syu"

# -r : remove package
alias remove="sudo pacman -R"

# text editor alias
alias edit="$EDITOR"

# edit as root
alias sedit="sudo $EDITOR"

# redo last command as root
alias please='sudo "$BASH" -c "$(history -p !!)"'
Now we will tell our current shell environment to use these settings:
source .bashrc
Common User Directories
In Windows, we are used to having some common user directories, such as "Desktop" or "Documents". Let's get that same experience in Linux.
- We could just create them with mkdir, but for getting some external functionality that we will use later, let's install XDG User Directories.
install xdg-user-dirs # We use our install alias that we created earlier
- Now we can run xdg-user-dirs-update to create the directories
xdg-user-dirs-update
- Now we should see our new user folders in our home directory
ls ~
GUI Interface
Concepts
Display Manager (Login Manager)
The display manager is the first thing we see when we boot up our operating system. The display manager's job is to handle our login process as well as start the display server and window manager
Display Server
The display server is the manager of all graphical applications. Any application that runs with a GUI is a client of the display server. This server will handle inputs from the kernel and send them to the correct GUI client. Your keyboard, for example, will be sent to the currently focused window.
The most popular display server protocol is the X Window System and the main program that implements this is call Xorg.
A newer alternative to the X Window System (although still not extremely popular) is Wayland.
Window Manager
The window manager is responsible for handling windows on the screen. Where to place them, how to show and interact with them, etc. A window is a single instance of a program shown in a single pane on the screen.
Typically, the window manager is also responsible for handling the panel, if it has one. This is the bar at one of the edges of the screen that present you with information about currently opened windows, the date/time, etc.
Desktop Environment
A desktop environment is a Window Manager packaged with many other applications that help handle the system. For example, a settings menu, system tray, task manager, etc.
These come in a lot of different shapes and sizes, but make your life much easier when using the system. These are not required and a simple standalone Window Manager can be used. However, for beginners, this is not recommended, as you will be missing a lot of things that you may assume are fundamental to the operating system, such as a settings application.
Some DE's also ship with a display manager, such as Gnome, whch ships with the Gnome Display Manager (GDM).
Installation
Now we are going to install a user interface into our system. This is where you really get to branch off into making your system your own. We are going to install a few things:
- (xorg-server, xorg-xinit xorg-xrdb) A display server. This display server will be responsible for handling outputting content to our screen.
- (lightdm lightdm-gtk-greeter) A display manager (or login manager). This is what will handle user authentication and will start the display server.
- (cinnamon) - A windows-like desktop environment (KDE Plasma is another good alternative here)
- (cutefish) - A mac-like desktop environment
- (alacritty) A terminal emulator. This will give us access to the cli (like we are using right now) inside of a window. In windows, this is the only way to get to the cli, so it should be familiar if you have ever used them.
- (ttf-dejavu) A system font. Without fonts downloaded on your system, the display manager can't show you text. We will install the DejaVu font, as it is pretty easy on the eyes.
install xorg-server xorg-xinit xorg-xrdb lightdm lightdm-gtk-greeter cinnamon cutefish alacritty ttf-dejavu
Our display server will run as a service and will be the first thing we see when our OS boots. We will need to enable this service.
sudo systemctl enable lightdm
Arch User Repository
pacman -S --needed git base-devel
git clone https://aur.archlinux.org/yay.git
cd yay
makepkg -si
Fix Icons
pacman -S hicolor-icon-theme
pacman -S adwaita-icon-theme
yay -S nerd-fonts-sf-mono
Reboot
The Login Manager is going to take ahold of our session on the next boot. To get into the Login Manager, we will reboot.
sudo reboot
First Steps
Fix Screen Size
Now that we have the terminal open, let's fix the resolution of the screen using the xrandr command
xrandr -s widthxheight
Install Virtual Box Tools
VirtualBox has some tools used to manage the system. We will install this next:
install virtualbox-guest-utils
We will also need to enable the VirtualBox service
sudo systemctl enable vboxservice
This will require a reboot. Also, in Virtual Box, open the VM settings. Under "General" -> "Advanced" enable clipboard and drag 'n drop features.
Conclusion
At this point, you have a functional operating system with some minor customizations. Future tutorials will branch into very different categories. It is highly recommended that you zip this VM up or clone it. I recommend zipping, as it will take up less space and will be untouchable in VirtualBox, keeping you from accidentally messing with it in the application.
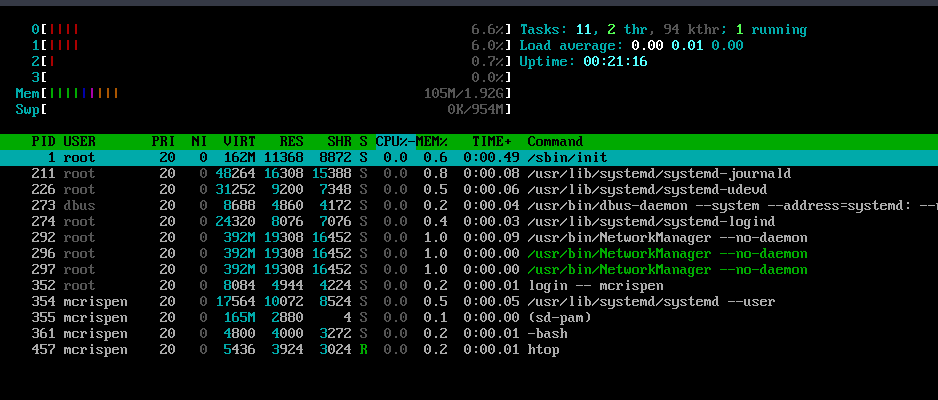
This build is incredibly minimal, however, you could do some very basic work on this system or install what you need and run it as a server. Below is my htop output from this machine. As you can see, very few processes are running on the system and it is only using 105 MB of memory. Contrast that with an operating system like Windows, which uses upwards of 2-3 GB cold boot (i.e., nothing extra running).
Appendix
Base Package Contents
bash
bzip2
coreutils
file
filesystem
findutils
gawk
gcc-libs
gettext
glibc
grep
gzip
iproute2
iputils
licenses
pacman
pciutils
procps-ng
psmisc
sed
shadow
systemd
systemd-sysvcompat
tar
util-linux
xz
[archived] Customization
For the next few steps, we are going to need to clone this git repository (the one that generates this web site). Let's install git
install git
Now, run the following commands
git clone https://gitlab.com/t9741/arch-linux-guide.git
cd arch-linux-guide
This will download some configuration files that we are going to use as a base line for our build.
QTile
QTile (or window manager), has the most impact on the look/feel of our system. It's the first thing we see when we log in and the QTile panel is always there. Let's start by copying over our base config to it:
cp content/configs/tangled/qtile/.config/qtile/config.py ~/.config/qtile/config.py
To make our QTile config work we will need to run the following commands:
install python-pip
pip install psutil
touch ~/.config/qtile/modkey
touch ~/.config/qtile/autostart.sh
chmod +x ~/.config/qtile/autostart.sh
Typically, after changing our QTile config, we won't need to reboot. However this time we will to make the psutil change take effect. This won't need to be done again.
Now, our QTile config should look much better than it did before.
To read more about this configuration, see My Qtile Configuration.
DMenu
Let's also replace the run launcher with a better program called dmenu.
install dmenu
There is a keybinding in QTile to run this program (mod+shift+D).
Alacritty
The next most common program we will see on our screen is alacritty. Let's copy the config over for this as well.
mkdir -p ~/.config/alacritty
cd ~/arch-linux-guide
cp content/configs/tangled/alacritty/.config/alacritty/alacritty.yml ~/.config/alacritty/
You can edit the "~/.config/alacritty.yml" file and change the "size: 9" line to increase the font size. I recommend 14-18. Alacritty should update as soon as you write the changes.
See My Alacritty Config.
Wallpaper
Some wallpapers would make this look much better. To handle our wallpapers, we will use a program called "nitrogen".
install nitrogen
Nitrogen itself does not have wallpapers, so we will download some.
install archlinux-wallpaper
Now let's use dmenu to open it. Use the mod+shift+D key binding to open dmenu and run "nitrogen".
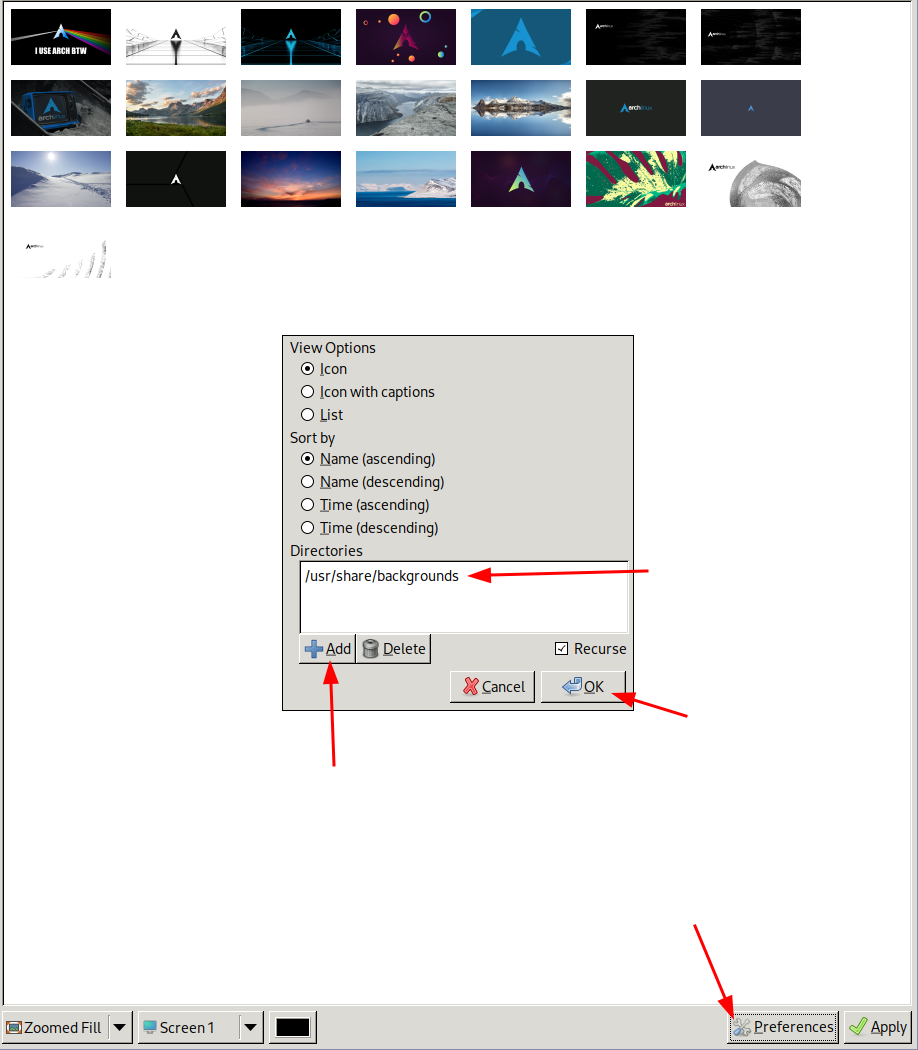
Once open, we will go to "preferences" and add a new folder for wallpapers. Add "/usr/share/backgrounds" to the wallpapers folders.
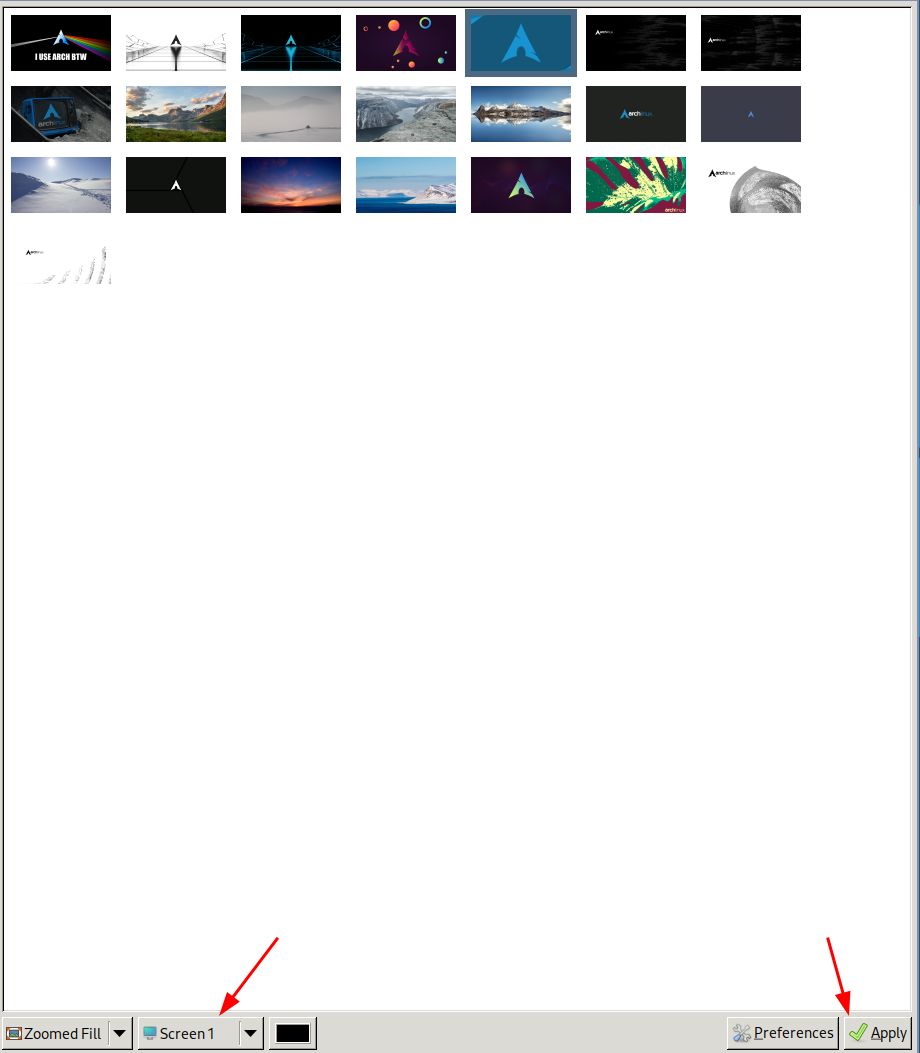
Change "Full Screen" to "Screen 1", select a wallpaper and hit "Apply"